Contents
Overview - Details general palette information.
Columns - Lists what all the palette columns are mapped to.
Rows - Lists all the palettes in the game.
Modifying Palettes - Explains how to modify existing palettes.
Adding Palettes - Explains how to add new palettes.
Remarks - General and misc. information.
Overview
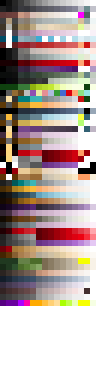
Location in the unpacked data: textures\palette.png
Palettes are used to recolour the many different assests in The End is Nigh. By loading different palettes for each unique area of the game, each zone is able to look drastically different whilst using many of the same assets.
The file that defines the palette information can be opened in any basic paint program to be modified, allowing for changes to be made to existing palettes as well as the ability to create entirely new ones.
The palette is made up of pixels, and these pixels are interpreted in two ways: as rows, and as a columns. The rows marks a unique palette that can be set, with its row number acting as its palette ID (0 - 63). Whereas each column the pixel is in (0 - 15) specifies what graphics the colour in that particular palette row will be mapped to, whether its background tiles, water/lava, tile details, etc.
Columns
The following section describes what assets/graphics each column of the palette is mapped to: |
 |
|
These palette columns will also impact other small features of the game’s graphics. However, these are the main uses of each of the different columns. |
|
Rows
The following section describes each palette row, and where it is used in the game:
00 - Super Mega Cart All Stars Intro Screen and The Game Intro Screen
01 - The End and The Save Select Menu
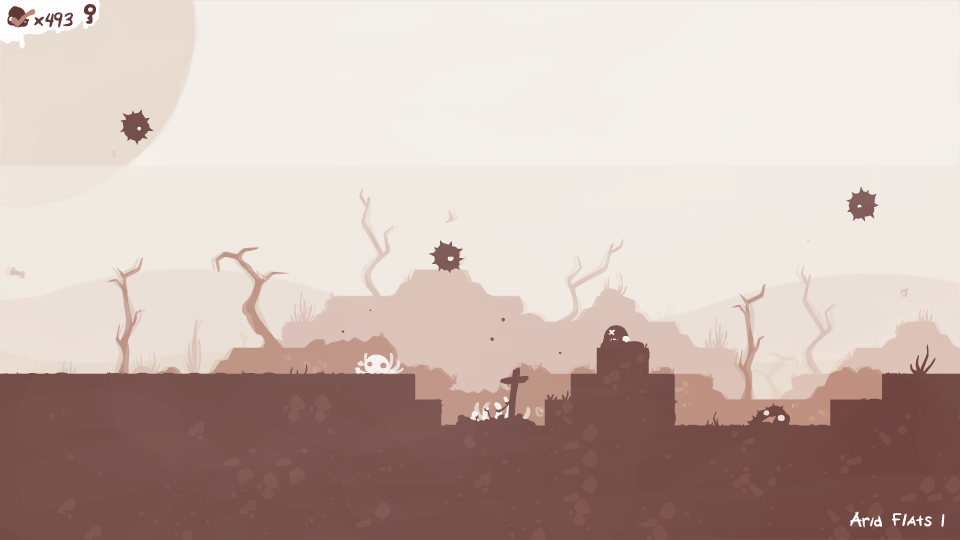
02 - Arid Flats
03 - Overflow
04 - The Split and Wall of Sorrow
05 - Retrograde
06 - The Hollows
07 - Unused
08 - SS Exodus
09 - The Machine
10 - Golgotha and Anguish
11 - Gloom
12 - Blight
13 - Ruin
14 - The End is Nigh Cartridge + Intro Screen and Corrupted Cartridge + Intro Screen
15 - Unused
16 - Mortaman Cartridge
17 - Blaster Massacre Cartridge
18 - Nevermore/The Future
19 - River City Rancid Cartridge
20 - Ash Climber Cartridge
21 - Catastrovania Cartridge
22 - Rubble Robble Cartridge
23 - Fallen Fantasy Cartridge
24 - Morbid Gear Cartridge
25 - Dig Dead Cartridge
26 - Super Mega Cart All Stars Cartridge
27 - Spike Tales Cartridge
28 - Scab or Die Cartridge
29 - Tombs and Torture Cartridge
30 - Mortaman Intro Screen and Pus-Man Cartridge + Intro Screen
31 - Blaster Massacre Intro Screen
32 - River City Rancid Intro Screen
33 - Ash Climber Intro Screen
34 - Catastrovania Intro Screen
35 - Rubble Robble Intro Screen
36 - Fallen Fantasy Intro Screen
37 - Morbid Gear Intro Screen
38 - Dig Dead Intro Screen
39 - Unused
40 - Spike Tales Intro Screen
41 - Scab or Die Intro Screen
42 - Tombs and Torture Intro Screen
43 - Ghosts ’N Grieving Cartridge
44 - Ghosts ’N Grieving Intro Screen
45 - Depression Cartridge + Intro Screen
46 - Denial Cartridge + Intro Screen
47 - Anger Cartridge + Intro Screen
48 - Bargaining Cartridge + Intro Screen
49 - Acceptance Cartridge + Intro Screen
50 - Dead Racer Cartridge + Intro Screen
All palettes onwards are unused and will display completely white unless modified. This leaves modders with 16 palettes that can be added without needing to modify the palette to accept more colours; see the second-half of the following section for details on how to add more palettes.
Modifying Palettes
Once the palette.png file has been modified, or if you simply want to give an area an existing palette, the tilesets.txt needs to be modified for a palette to be assigned. Locate the unpacked game data and navigate to the "data\" directory, in there will be a file called "tilesets.txt", open this file. Locate the area which you would wish to modify, this can be found by looking at the area_name variable which will list the name of each area. Once the area has been found simply set the palette variable to the row number of your desired palette; remember that the top-most row in the palette.png image is palette 0 and they continue incrementing upwards in value the further down the image they are.
In the example below, the Arid Flats has been assigned the palette 10 (which is used for Golgotha and Anguish). Changing this value and relaunching the game produces the results on the right, compared to the original palette seen on the left.

For a more in-depth look at the various aspects of the tilesets.txt file, as well as how to modify it, click here.
Adding Palettes
In its default state, the palettes file can only store 64 unique palette entries (rows). However, this can be changed by modifying aspects of certain shader, which can be located in the "shaders\" directory of the unpacked data. Two specific shaders will need to be modified for this to work "colormapped.shader" and "colormapped_duplicatedforstupidreasons.shader", as these shaders control how colours from the palette are mapped to colours used by the game's assets.
Open both palettes in any text editor (Notepad, Notepad++, Sublime-Text, etc.) and you will see the following text:
colormapped:
01 #version 130
02
03 uniform mat2x4 color_xform;
04 uniform sampler2D palettetex;
05 uniform float palette;
06
07 #if COMPILING_VERTEX_PROGRAM
08
09 void vert(){
10 //gl_FrontColor = gl_Color * color_xform[0] + color_xform[1];
11 vec4 outcolor = gl_Color * color_xform[0] + color_xform[1];
12 gl_FrontColor = vec4(texture(palettetex, vec2((outcolor.r*15.0+.5)/16.0,(palette+.5)/64.0)).rgb,
outcolor.a);
13 gl_Position = gl_ModelViewProjectionMatrix * gl_Vertex;
14 }
15
16 #elif COMPILING_FRAGMENT_PROGRAM
17
18 void frag(){
19 gl_FragColor = gl_Color;
20 }
21
22 #endif
colormapped_duplicatedforstupidreasons:
01 #version 130
02
03 uniform mat2x4 color_xform;
04 uniform sampler2D palettetex;
05 uniform float palette;
06
07 #if COMPILING_VERTEX_PROGRAM
08
09 void vert(){
10 //gl_FrontColor = gl_Color * color_xform[0] + color_xform[1];
11 vec4 outcolor = gl_Color * color_xform[0] + color_xform[1];
12
13 gl_FrontColor = vec4(texture(palettetex, vec2((outcolor.r*15.0+.5)/16.0,(palette+.5)/64.0)).rgb,
outcolor.a);
14 if(outcolor.r < .1 && outcolor.g < .1 && outcolor.b > .9){
15 gl_FrontColor = vec4(0.0,0.0,0.0, outcolor.a);
16 }
17
18 gl_Position = gl_ModelViewProjectionMatrix * gl_Vertex;
19 }
20
21 #elif COMPILING_FRAGMENT_PROGRAM
22
23 void frag(){
24 gl_FragColor = gl_Color;
25 }
26
27 #endif
The highlighted values are the important ones, the 16.0 is the number of columns in the palette file (width) and the 64.0 is the number of rows in the palette file (height). The height is the only value that needs to be modified, simply change this value in both shaders to the number of however many palettes you would like, make sure this matches your palette file itself. Now the new palette row number (64 onwards) needs to simply be referenced in the "tilesets.txt" file for the area that will use the new palette (see the Modifying Palettes section if you do not know how to set a palette for an area), and that is all that needs to be done to add more palette rows to the game.
For more information regarding shaders, click here.
Remarks
Expanding the "palette.png" file to add more palettes, without making the appropriate changes to the colour mapping shaders, will result in incorrect colours and palettes being displayed.
Transparency/alpha is not read from the palette, so saving semi-transparent pixels will simply result in the same colour being used in-game, but with the alpha being set to full - removing the transparency. Fully transparent pixels will either be black or white, depending on how the paint program being used to modify the palette handles saving transparency.
The map screen will make use of colours from the currently loaded area palette to tint the different icons, graphics, etc. As will other graphical elements, such as the tumor counter, NPC text boxes, etc.